Turning Green Wood
By
Howard Lewin
The lure of turning green wood has been the cause of a great deal of frustration among novice and advanced wood turners. The potential rewards and possibilities are seemingly endless, and the appeal is so strong that it is tried and tried, again and again, with failure every time. The bowls always crack. This article is about how to turn green wood successfully. There are a few techniques that must be mastered, and a couple of tricks that need to be employed before the success rate makes it fun and worthwhile. These tricks and techniques do not require the use of special chemicals or preservatives, only a few good gouges, common sense, and perseverance. Hocus pocus is also not required, although incantations to the other side might add to the mystery of your success. Let us begin by explaining the reasons why turning green wood is so appealing.
First is that the selection of woods available is unlimited. Wherever you live, a variety of species is available. Many of these species are not available as lumber at any price, but green logs are free for the asking to turners who keep their eyes and ears open. I live in Los Angeles. Whatever grows here, for the most part, came from somewhere else. I can select from varieties that are indigenous to California and from those that originated in the east, as well as those that have come from all over the world. My eastern colleagues are constantly teasing me, telling me that finding turning stock must be difficult because LA does not have any forests. I just smile because I happen to live in the most diversified forest in the world; Camphor wood from China, Cork Oak from Portugal, Carob originally from the Middle East and known for its seeds as a chocolate substitute, Siberian Elm from Siberia, as well as all of the Pines, Magnolias, Sycamores, Oaks, Ashes, Maples, Fruit trees, and on and on and on that are familiar to my wood turning brethren on the east coast. It all grows here!
The Second lure to turning green wood is that the size of the bowl is not limited to what is available in the lumber yard. Just for fun, go to your local lumber yard and ask one of the salesmen for a Walnut bowl blank 12” X 12” X 12” and notice the perplexed look on his face. Obtaining large blanks from green wood sources is only dependent on the size of the tree you cut down. I personally prefer logs with diameters of 16” to 20”. Why? Anything larger becomes a logistical nightmare. You simply cannot lift them. A green log 16” in diameter and only 24” long can weigh over 150 lbs.
The Third reason for turning green wood is that it is easier. Wet wood is softer therefore making the cutting easier and faster and because it is wet it keeps the tool cooler, which allows it to stay sharp for a longer period of time. Cutting wet produces less dust, creates larger shavings which are easier to clean up. Sanding is easier, since most of he dust does not stay airborne as long, wood is softer and cuts faster, and wood can be wet sanded, which creates no dust at all. Wet wood is much easier to cut with chain saws and band saws. This also creates less dust. Turning end grain pieces becomes possible, if not downright easy compared to dried wood.
The Fourth motive for turning wet wood is that it allows total freedom as to what shape to turn. Because the wood is flexible and easily cut, bowls and vessel forms can be shaped with very thin walls. Turning end grain vessel shapes not only becomes doable, but easy. These forms are very difficult with dry wood. My favorite shapes are natural edged bowls that include the bark with double bull’s eyes on the sides. In other words, the pith/heartwood is on the sides of the bowl. Let me define what I mean by the pith/heartwood. The absolute center of the tree is called the pith.

Photo 1 Shows The Pith/Heartwood And The Layout For 4 Natural Edge Bowls.
It is surrounded by about 1”-2” of denser heartwood. It is this 1”-2” area of heart wood surrounding the pith that is generally the culprit that causes bowls to crack and split. Since heartwood surrounding the pith is denser and usually darker in color, this adds a unique design character to the bowl. Additionally, when the wood dries, the shrinkage of the heartwood surrounding the pith sometimes causes the growth rings to bulge out. I have been asked many times how I painted the growth rings onto the sides of the bowl. The growth ring configuration of Pine is especially beautiful.
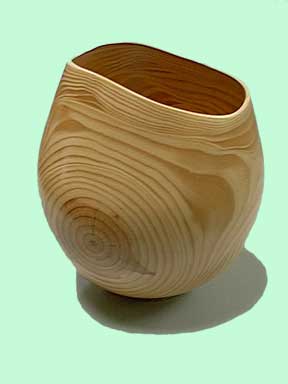
Double Bulls Eye Pine Bowl 12" X 14"
The Fifth argument in favor of turning green wood and the one that adds a certain mystery to the process, some of that Hocus Pocus mentioned earlier, is just this: the final shape is largely undetermined. Most of what I turn includes the pith/ heartwood, so what follows applies to turning bowl blanks with the pith/heartwood included. Once the piece has been turned and sanded and set aside to dry, wondrous changes take place. This is usually a surprise. Movement during the drying process when the pith/heartwood is included is generally undetermined, unpredictable, and uncontrolled. This adds a mystical quality to the work. These events are exciting, and give the bowl that magical quality. Most of the time a bowl elongates, but sometimes it will really change shape dramatically. I have had bowls almost close and others twist as severely as any pretzel, all without cracking. This movement is generally true of bowls that have been turned from face grain which has pith/heartwood included, ie. the grain is perpendicular to the bed of the lathe. End grain turnings, wood parallel to the bed of the lathe, are generally very stable and do not move much at all, especially if the pith/heartwood is removed. I have had good success turning end grain with the pith/heartwood right down the middle of the form.
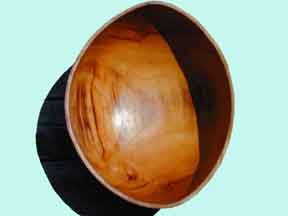
This Bowl Was Round When It Went Into The
Paper Bags. Sycamore 12" X 16"
The Sixth and final reason for turning green wood is perhaps one of the most important. Green wood is generally free. In Los Angeles, tree trimmers have to pay to dump their loads. I allow them to dump their loads free at my studio. They grind up the leaves and small branches and sell that as mulch. I just want the large branches and trunks as logs. Think about it. It is delivered already cut and free.The tree trimmers are happy because they do not have to pay a dump fee, and I am happy because I have a lot of bowl blanks. Now maybe a whole truck load is a bit much; most people don’t require a whole load. On this note I admit to being a bit greedy. However, you can pick pieces when they are cutting the tree down. Just call a tree trimmer in your area and find out when and where he will be cutting his next tree. He will usually be happy to give you all that you can haul away, because the bottom line is that he does not want to pay to dump it. Try to get the logs cut a little longer than the diameter, at least 6” longer. This gives you a safety net in case the logs start to check.
The second benefit to you as a wood turner for using free green wood is a financial one. When you sell your work, you can do so at a reasonable price. Since the price of all work sold in galleries is doubled over the price you need to get, anything you pay for the wood is also doubled. Let’s work this out. If you pay $40.00 for a nice piece of wood, it is now an $80.00 piece of wood, and you have not even mounted it on the lathe! Now you spend time turning it and add more to the final selling price. It does not take to long before you have created an unsellable work. The price you pay for wood can truly have a negative affect on the salability of your work.
An additional advantage is that it allows you to experiment without the burden of worrying about the cost of materials. When wood is free, you are more likely to take chances with new designs and techniques than when you have paid dearly for the wood. This can really affect future sales, because experimentation, skill improvement and product development are essential for personal growth, artistic renewal and marketability.
Now that we know why we turn green wood, we need to understand how to cut it and prepare it for turning. For this you will need chain saws and, if you can afford it, at least a 12” band saw. You really need two chain saws. Use a gas powered one for cutting trees down and cutting up fallen trees. Gas is necessary here because there are never any electric outlets around where you need them. You also need an electric chain saw to operate in your shop. Firing up a gas chain saw in your shop is hard on your ears, and neighbors do not take kindly to that kind noise on a Sunday morning. It seems that I always want to turn a bowl on a Sunday morning. When cutting logs to length, cut them about 6” or more longer than the diameter of the log. This will ensure that you get a clean end if the log checks. The chain saw can be used to efficiently cut large logs into more manageable pieces.
Before cutting into that log, examine it carefully for nails and staples, especially if it was cut down near the curb or in a back yard. Garage sale ads are put on every tree lining a street, and play houses are built in back yard trees. This doesn’t mean that the tree cannot be cut up, but be careful. Nails are not good for chain saws or band saws.
Cutting branches or trunks to length is easy. It is the basic cross cutting technique.
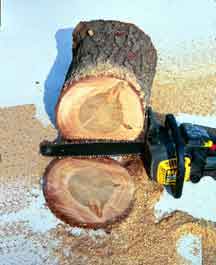
Photo 2 Typical Chain Saw Cross Cut.
Where most beginners run into trouble is in cutting a log down the middle. This is one of the most important cuts in preparing green wood for turning, because the middle of the log is the location of the the pith/heart wood. It is the area of the log that is most likely to split, and therefore its removal helps prevent checking when the blank is going to be stored for an extended period of time. The temptation is to set the log up on its end and start cutting down.
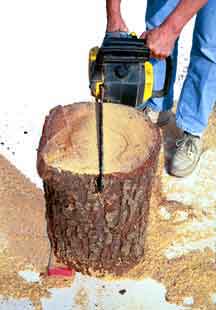
Photo 3 Hard Way To Cut A Log DownThe Middle
This is the most difficult cut to make because you are cutting end grain the entire length of the log. [There is a chain designed to do this , ie, cut down the length of logs and it is used in chain saw mills. These mills can cut logs into planks with reasonable efficiency. Standard off the shelf chain saws are not equipped with such chains.] If you cut a log this way, look at the shavings or should I say lack of them. You will see dust for the most part. For faster and easier cutting, lay the log down and cut parallel to the the length of the log.
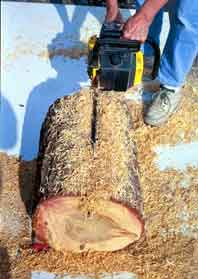
Photo 4 Easy Way To Cut A Log Down The Middle.
Notice the difference. Long shavings are produced, and faster cutting is achieved. Make sure to prop up the log so it will not roll , and make sure that as you get close to cutting through, stop and turn the log over.
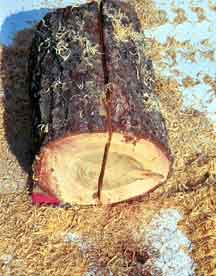
Photo 5 Almost Completed Cut.
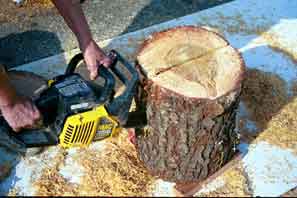
Photo 6 Now You Can Even Stand It On It's End And Cut
Down, Since There Is So Little Left To Cut.
Also make sure that you clean the long shavings out of the chip port of the chain, or they will build up and bind the chain. Either way, it is important that when you break through, you do not hit dirt or rocks or concrete. Sharpening a dull chain is not difficult, but it is not as much fun as cutting free turning blanks. It is imperative to keep the chains sharp and well oiled. The fastest way to burn out a chain saw is to try cutting wood with a dull chain without oil. Remember also that the chain and bar can get very hot. Do not touch them immediately after cutting through a log. Even wet wood generates enough friction to heat up a chain and its bar.
Once you have cut the logs into more manageable pieces, the rest can be cut up on a band saw to meet your needs. This does not mean that you can’t cut your blanks with a chain saw. I have done that often. It takes a little more diligence and time, but it can be done that way. However, having said that, once they are liftable, the final cutting on the band saw can save you a lot of time by cutting away unnecessary wood more accurately. Mark an outline on the blank with a compass or a disc, an old table saw blade works.
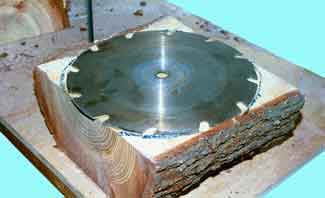
Photo 7 Using An Old Saw Blade Is A Quick Way To
Reference A Circle. A Compass Will Work Too.
This gives you some guide when you are cutting the blank. I have a 36” band saw that will cut up to 20” diameter logs. Have you ever tried to lift a 20” diameter log up onto a bandsaw table? While not impossible, I would say that it is difficult. They are heavy. That is why I use a chain saw to make logs more manageable. What you need is a band saw that can cut about 12” high and has a 20” throat, with a 2 HP motor. Most of what you turn will fit into this dimensional range. It is most important when cutting wet or green wood with a band saw that the blade be a 3 or 4 Tooth Per Inch skip tooth blade. A hooked tooth blade does not shed wet sawdust as well as a skip tooth, so build up on the blade becomes a problem, in fact downright dangerous. Remember to always allow the blade to do the cutting. Never force the wood into the blade; let it feed itself. Forcing the cut can severely distort the blade, especially on large pieces, causing severe heat buildup which crystallizes the blade’s weld and eventually causes the blade to break. If you have to force the wood into the blade to make it cut, it is time to change the blade or sharpen it. Photos
A word here about selecting bowl blank locations in the log. I have found that it makes little difference whether I mount the face plate on the heartwood side of the blank or on the sapwood or new growth side of the blank.
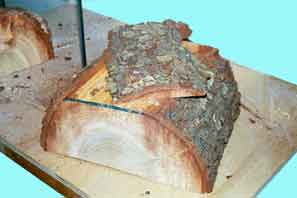
Photo 8 Shows A Bowl Blank Cut For A Flat
Top Bowl.
For face grain bowls, especially those with pith/heartwood, there is going to be some distortion no matter what you do, so what does it matter if you get a slight rocking on the foot after drying, or that the rim is a little off. At least it does not matter to me. The rocking foot can be cured quickly and efficiently with a belt sander. The oval shape to which a bowl dries makes a good story as to how you were able to turn the bowl that way. There is plenty of room here for distortions of the truth, and it can really be fun; some of that hocus pocus mentioned before. Generally speaking, the further away from the pith/heartwood the less a face grain bowl will move. When turning end grain bowls and vase forms, very little movement takes place, especially if you choose wood away from the pith/heartwood, so what you take off of the lathe is generally what you end up with. I prefer to turn with pith/heartwood in the piece. If you mount the blank on the pith/heartwood side, then you can turn natural edge bowls.
Photo 9 Pith/Heartwood Location. Layout For 4 Natural Edged Bowls
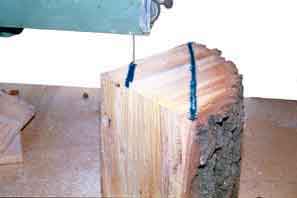
Photo 10 Lines Showing A Natural Edge Bowl.
That is where the brightest colors are located, and the subsequent movement during the drying process really adds mystery to the piece.
Now that you have cut your turning blanks, it is probably a good idea to find a place where they can be stored until you have time to turn them. The best location is on the side of a building that is constantly in the shade. If you do not have such a location, an open shed or a tarp will suffice. You want to minimize contact with direct sunlight as much as possible. It also helps to keep the area moist.
There are several products you can use to help seal the ends of the turning blanks, as well as all surface areas. A product called green wood sealer, which is a wax and oil emulsion, works really well. If you do not have access to this, old oil paints or canning wax work reasonably well. Whatever you do, do not wrap the blanks in plastic bags. This traps moisture in without allowing the wood to breathe, and sets up the perfect brewery for bacteria and fungi. If you are unlucky enough to open the bag a couple of weeks later, especially if the weather has been hot, I guarantee that you will never use plastic bags again. The odor permeates the wood and it never goes away. It remains as a constant reminder of why we don’t use plastic bags.
There is one exception to this rule. If you live in the desert, using plastic bags for short periods of time is perhaps one of the only ways you can prevent checking.
Now if you want the wood to spalt, ie have bacteria work wonderful color changes in the wood, set one end of the log on soil. Different species react to different molds and the resulting colors are different. It usually takes a couple of months, but the wait is usually well worth it. If you forget that you have done this and leave the log too long ( the spalting process is also called dry rot), the end result will be dry rot and a useless piece of wood.
If your time frame for turning is extended, don’t bother cutting the wood into turning blanks until you need them. Leave the logs whole and work off one end. Keep the ends of the log sealed as described above. Cutting as you need to will extend the life of the log until you are ready to start turning, within reason, that is. Don’t expect a log to stay check free for more than a few months. Weather conditions play a crucial role here. Hot dry conditions will cause logs to check more rapidly than wet or moist conditions. When cutting logs to length so that they are more manageable, make sure that you cut them at least 6 inches longer than the diameter. This is to ensure that if checking occurs, there is still enough wood left to utilize the full diameter of the log.
Now that we have our bowl blank cut and ready for turning, it is time to mount it onto the lathe. There are many methods available to accomplish this. Three and four jaw chucks, Screw Chucks, Expansion Chucks, and Face Plates are among the most commonly used devices.
Three and four jaw self centering chucks can be used, but there are a couple of “gotchas” when using them. The first is that there has to be a tenon turned for the jaws to grab onto. The size of this tenon is in proportion to the size of the bowl you want to turn. A large bowl about 12” should be 3” in diameter and at least 1” long. This requires turning the blank between centers first. Now depending on the size of the blank and the speed of your lathe, this can be done, however it is an extra step, and can be a bit intimidating because most spindle lathes run fast and have a short swing. The other problem is that most green wood is fairly soft, and the tenon will most likely become severely crushed when the jaws are tightened. This is a safety limitation because a crushed tenon cannot hold the turning blank securely.
The same limitations apply to expansion chucks. A fastening recess has to be turned or drilled into the bottom of the blank before it can be mounted on the chuck . The softness of green wood makes it susceptible to crushing when the jaws are expanded. This crushing severely limits the holding effectiveness of the expansion chuck. Additionally, since most chucks have the same jaw set up, bowl bottoms are all the same, disproportional sizes for larger and smaller bowls. Fastening points should be in proportion to the size of the bowl.
Screw chucks offer a viable alternative to the use of the above devices. Jerry Glaser manufactures a screw chuck (as well as the finest wood turning gouges in the world), with a sharp threaded screw that bites into the wood holding it securely. It also allows you to take the wood off the chuck, and put it back on, chasing the same threads. One requirement of this chuck is that the blank must have a flat surface so that the blank can snug up against the flanges of the chuck. Remember also that green wood is much weaker than dried wood, and the blank can pull out of the threads if aggressively turned. The use of cyanoacrylate glue in the screw hole greatly enhances the screw chuck’s ability to maintain its grip.
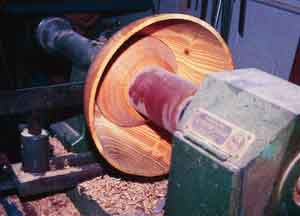
The best and safest attachment device, at least in my opinion, is the face plate.
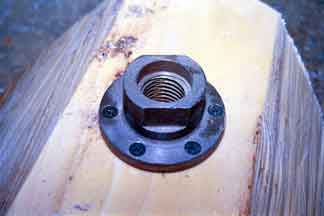
Photo 11 Face Plate Attachment.
The plate should be made of steel and be at least 1/4” thick at the flange. There should be at least 6 screw holes large enough to accommodate #10 screws. For most bowls, a 3” diameter face plate is quite sufficient. Most of mine are about 2.5”. Use large diameter screws in green wood because they grip better, however I have had great success with #6 X 1” drywall screws. It is also a good idea to flatten the blank’s attachment surface. This allows the screws to apply pressure evenly against the wood, and prevents the work piece from wobbling on the face plate.
It is not in the purview of this article to discuss in depth turning techniques. What we will discuss are the parameters required to successfully turn green wood. Mount the bowl blank onto the lathe. I always slide the tailstock up against the bowl blank in the preliminary roughing steps.

Photo 12 Bowl Blank Mounted On The Lathe Supported By The Tail Stock.
This gives more security and assures that when the hardest cuts are being made, the blank is trapped between the headstock and tailstocks . (Bowl gouges are a must here because they cut and slice the wood. Scrapers tend to cause tear out.) During this phase of roughing out, examine the wood carefully for any checks or cracking. It is imperative that any checks be turned completely out. If they are not they will cause the bowl to crack. Small cracks or checks just continue to grow, so they must be turned out. Once the outside has been shaped, remove the tailstock and begin the hollowing out process.
This is where the techniques mentioned in the beginning paragraph of this article are applied. Turn the bowl to a wall thickness of 1/4”. To accomplish this start at the center of the bowl and cut down about 1”-1 1/2” deep.
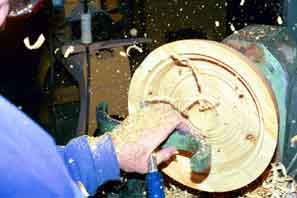
Photo 13 First Cuts Start At The Center And Work Towards The Outside Rim.
Move the gouge over about a 1/2” towards the outside rim. Keep moving toward the rim making the same depth of cut. When you get to the rim size it to 1/4”. Now go back to the center and make another cut an additional 1”-1 1/2” deep.
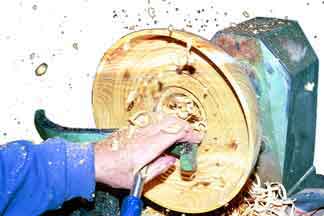
Photo 14 The Second Step.
Proceed as before. This stepping down process leaves strength and rigidity at the bowl’s side and allows you to cut a thin wall.
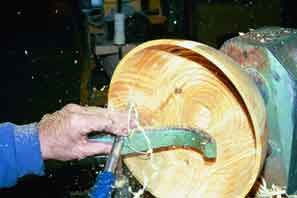
Photo 15 The Third Step.
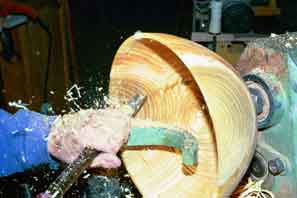
Photo 16 Cleaning Cuts.
Do not hollow out the bowl and then try to cut the walls thin, there is not enough rigidity to the wall to allow cutting. Once you have established the wall’s thickness do not go back to the rim and try to make another cut. It will end in disaster because there is no longer enough wood to support cutting. This is especially true for for end grain bowls and vase forms. On some woods it is possible to leave as much as 1/2”. It can be a skosh more or less. Speed is of the essence here (yours not lathe’s speed) because once the hollowing out begins the bowl will start changing shape. There will be no time for a coffee break at this stage. This requires some skill, but with practice it is easy to turn out a bowl with a 12” diameter in as little as 30 minutes. Photos and Illustrations.
Moisture content plays an important role as well. Dryer wood can be turned a little thicker. It is most important that whatever the wall thickness , it must be consistent throughout the bowl. Not just the walls, but the bottom must maintain this thickness, as well . This consistency of wall and bottom thickness assures that as the bowl dries, it will do so evenly. Success depends on this consistency. The reason bowls turned to this thickness (1/4” -1/2”)do not crack is simply that most of the mass is gone. What is left is thin enough so that the forces created during the drying process are dramatically relieved. That is, the wood is free to move and to relieve stress rather than relieving the stress by cracking.
After the turning is complete, allow the surface of the bowl to air dry before sanding. Keep the bowl on the face plate for day or so, or until the surface is dry enough to sand. In hot dry weather you may only need a couple of hours. You can wet sand, and that is a good technique, however it adds to the drying time. Wet sanding employs wet/dry sand paper and liberal amounts of water to lubricate the wood and to wash away the wood particles. You can also flash dry a wet bowl with a propane torch. When applying this technique, do not loiter in one place too long. The purpose is to flash the surface moisture off, not to dry the bowl. Too much heat will crack the bowl. This procedure takes a lot of time and propane is not cheap. The same thing can be said about sanding. Applying too much pressure while sanding in one place too long can cause cracking because of heat buildup. High speed is another culprit, slower speeds for sanding are preferred. After sanding is complete, usually up through #150 grit sandpaper, mark the center of the bowl through the face plate hole and jam or reverse turn the screw holes out of the foot of the bowl .
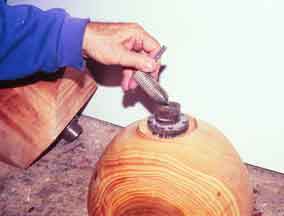
Photo 17 Marking The Center Of The Foot.
You can also turn off the bowl with a parting tool. It is important that this dimension, the bottom thickness, be the same as the wall thickness.
Photos 18 Reverse Jam.
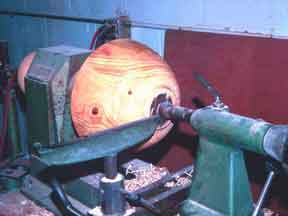
Photo 19 Tail Stock Holding Bowl Against The Jam.
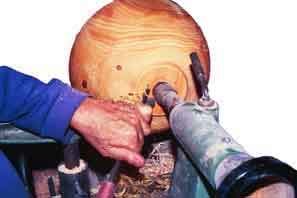
Photo 20 Making The Cuts.
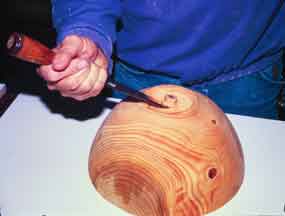
Photo 21 Knocking Off The Small Tenon.
Now for the tricks mentioned in the first paragraph. The first is not to sand the bottom where you have just turned out the screw holes. Power Sanding ( is there any other kind? ) generates a lot of heat in a small place. This alone is enough to cause cracking. Wait until the bowl is dry to complete this task. The second is to place the wet bowl into three brown supermarket paper grocery bags, one inside the other, and wrap them tightly. I use three because the weather here (Southern California) can change dramatically from humid to very dry in a matter of hours. In areas where the humidity is consistently high and tends to stay that way, three bags may be overkill, but it is always better to be safe than sorry, especially now that the bowl is finished. Do not use plastic bags. Leave the bowl in your workshop, in your garage, or any environment that maintains a steady humidity and temperature. An air conditioned or heated room is not a good idea. Check the bags periodically. When the bags are dry the bowl is dry. This usually takes anywhere from 1 or 2 days to 3 weeks depending on the moisture content of the wood, the ambient humidity and temperature, and the species. Wood generally air dries at about an inch per year. The walls are about 1/4” thick and they are drying from both sides. Brown paper bags allow moisture to migrate from the bowl to the outside very slowly. When there is little or no moisture left in the bowl, the bags will be dry. If you live in the desert try 4 or even 5 bags. During the drying process, those mysterious events take place inside the brown paper bags.
Another drying technique is to nuke the bowl in a microwave oven. This technique is not very efficient because a microwave was not designed to vent moisture, but rather to keep it in. So the trick is to nuke the bowl and take it out of the oven ( Wear gloves. The bowl gets really hot.) and let it steam off the moisture outside of the oven. Keep doing this until the bowl loses most of its moisture. The idea here is not to leave it in for a long period of time, otherwise you will char the wood. Short bursts of a minute or so will do the trick. I find this to be time consuming, as it requires too many trips (30-40) back and forth to the microwave oven. The same thing can be accomplished using paper bags without any of the effort. What is really neat about microwave heating, though, is the steam bending potential of a soaking wet bowl. You can really do some neat stuff. If the walls are thin enough, you can bend the sides towards each other, like a pitcher. Just try to explain how you turned the bowl that way. I have had a lot of fun doing so.
There are many wood turners who prefer to rough turn a blank leaving it thick, about a 1” wall, and drying the roughed out bowl for three to six months, then remounting the bowl and finish turning it. This is risky because it does not remove enough mass, and checking and cracking may occur. Furthermore, the process takes too long. Their reasoning is that the bowls maintain their shape, i.e. they stay rounder. How boring. My experience has been that they still move. Not as much perhaps, but the final product is still not perfectly round. This procedure generally precludes the possibility of turning natural edge bowls with the bark attached.
Yet another curing technique is to soak the turned bowls in polyethylene glycol (PEG). The theory here is that the PEG replaces the moisture in the cells of the wood and thus keeps the bowl from cracking. This process is laborious, requiring at least a couple of weeks of soaking and an additional couple of weeks air drying, or low temperature oven drying. And what do you get for all of this additional work? A bowl that feels waxy to the touch, will not take a finish, and is so hydroscopic that it always feels damp and clammy. I experimented with PEG for more than six months and felt it to be a total waste of my time.
After you have completed your bowls it is time to apply a finish to them. Any of the standard finishes will work. For oil finishes I use Minwax Antique Oil. It dries overnight and will buff up well. For bowls that will be used as eating utensils, use mineral oil or corn oil. Other oils will work as well, however do not use Peanut or Olive oil as they collect dirt and bacteria and tend to ripen with age. Interior Deft is a good finish and can be applied with a brush or sprayed. Do not apply more than one or two coats because the solids in the finish do not leave a hard surface. Most of the bowls I turn today are finished with lacquer. It sprays easily, dries quickly and leaves a hard finish; three key elements I like.
This brings us full circle. Turn your bowls out of green wood, the wetter the better, do the whole operation at one time, allow them to dry in paper bags, and then apply a finish to them. The true test is to go out into your shop and try it. What have got to lose? The wood is free. Keep at it until you have mastered these simple techniques and tricks; it will be well worth the effort. The mere fact that you have recycled throwaway wood into something useful and beautiful is reward enough, and sometimes you can even sell them. That is, as they say, the icing on the cake.
Copy Right © Howard Lewin 2000 All Rights Reserved
To see the article as it appeared in Fine WoodWorking Magazine