Lowering The Odds
While driving down the freeway at 65 mph. during rush hour, the car ahead suddenly veers across 5 lanes of traffic to make the off ramp. Without exception we wonder at the sanity of the driver, who without the slightest regard for the safety of himself, or others on the highway, just had to make that exit. All of us have experienced this. Most of the time, it is just a breath taking close call, and the event is soon forgotten. We all know, that if this behavior happens often, it is just a question of time before that driver will pay dearly for his transgressions.
So it is in our work shops. Everyday, we cross 5 lanes of traffic, and get away with it, most of the time, totally unaware that we have transgressed. It is the little things that we do incorrectly that increase the odds that sooner or later will cause us injury.
The table saw is the most important tool in the modern day cabinet makers, furniture makers, hobbyists tool chest. It is also the most abused, incorrectly used and is totally unforgiving. For these reasons I have chosen it as the focus of Lowering the Odds.
All of us who work with our hands must understand that it is just a question of time before we sustain an injury. What we must do is extend that time frame as far into the future as possible. To achieve this extension of time we must lower the odds. To accomplish this, we should be fully aware of what we are doing at all times. It is essential to question our procedures and frequently ask ourselves, can it be done safer, better,easier, and more quickly?
Anyone who works with their hands must develop a tolerance for pain. I know that this sounds absurd, however if, in the process of cutting or working, we injure ourselves, we must maintain our poise, and not cause further injury to ourselves by over reacting. Let me tell you a story that really happened. This person shall remain unnamed. This person stands about 6’ 4” and was cutting on the table saw. The events that occurred happened so quickly that I was transfixed and unable to react until it was all over. He was ripping a long board of hard white oak, and was standing directly behind the board. The cut was about two thirds down the length of the board, when his left hand slipped on the outside edge of the plank, picking up a relatively long splinter. He yelled and instinctively let go of the board to examine the splinter. My attention was focused on the yell. Within a microsecond I saw the board launch itself directly backward, I heard a dull thud, immediately followed by a loud groan, and saw him fall to his hands and knees. The board was not out of the trap between the blade and the fence, and as he fell the board, now free to travel again, continued on its way backward, just grazing his head as it flew out the open door of my shop. He walked kind of funny for a couple of weeks, and had a headache for a couple more. My only question to him was, what hurt more, the sliver , the pain between your legs, or your headache.
The lessons to be learned from this are very simple. Suffer the pain or injury, but, don’t forget that you still have a machine running and that if you lose your wits over a small injury, no matter how painful, you could really cause yourself a more serious one. Maintain your poise, shut down the machine, and then and only then can you go into hysterics and yell and scream for help. Never stand directly behind the board you are cutting. Remember always, that the machine does not have a conscience. It will not say that it is sorry, it will not shut itself off, and it will not mourn for your pain.
Know where help is. Where are the nearest emergency rooms, and what are their specialties. It does you no good to rush to the nearest hospital and find out that they do not have an orthopedic surgeon, who can put you back together. I know that this sounds a bit over cautious, but this is exactly what happened to me when I injured myself. It was no fun making two separate trips to different hospitals.
The height of the blade is directly proportional to the amount you are willing to lose. I have been to wood working shows where demonstrators have told those gathered around, to raise the blade above the gullets of the teeth and even higher. This is the worst advice you can ever get. The blade should never, and I will repeat it, never be higher than just enough to cut through the wood. This should be self-evident. If the blade is higher than that, you are risking your whole hand if there is a kick back,or other mishap. There just is not enough reaction time to pull your hand away in the event that something goes wrong, and with the blade higher than just high enough, you will lose something.
A dull blade is no excuse for more horse power. It can easily cause an injury because a dull blade creates a lot of friction, which generates a lot of heat, which causes the wood to bow, in some species quite severely. This bowing can literally clamp a board to the blade, causing a severe kickback. Heat also causes steel to distort. I have seen 10” blades running as much 1/8 “ out of true, and bigger diameter blades as much as a 1/4”, caused by the friction generated heat warping the blade. There is nothing more exciting than wobble cutting your way down a plank of hard Oak. The surest sign that a blade is dull, is the smoke billowing out from under your saw. I had a friend who really believed, that this was caused by insufficient horsepower. I assured him that a sharp blade would stop the smoke. He was adamant, and purchased a much higher horsepower motor, with the same results. He finally conceded to my theory, and a sharp blade was installed. He was greatly surprised, when there was no smoke. Another sign of a dull blade is the increased effort required to push the wood through the cut. Good sharp blades make cutting almost effortless .
How much horsepower is enough? It really depends on what you are doing. If you are ripping 3” thick lumber all day long, then 5-7 HP is required. With HP in this category, a power feed is also required. There is no way that you can shove a 3” thick board past a blade with that kind of HP without taking a big chance. The odds are against. it. A power feed makes it safe and sane, but not quite as convenient.
For more general work, I find that 3 HP is plenty. This is just on the verge of being too much to handle. This kind of HP is sufficient for thick lumber on an occasional basis. Most of the time I turn the boards over, and make two cuts. This is less painful for the motor, and me. Most hobbyists, can get by very well with 1 1/2 HP. Anything less than l 1/2 is getting into a dangerous situation. There is just not enough power to make the machine useful. The machine will stall out frequently, you will trip breakers in the garage, and house, and eventually fry the motor, possibly causing a fire. I strongly recommend that no matter what HP motor you have, make sure that it is connected to a 220 volt circuit. This will give you faster starts, will not dim the lights in the house, shut down the refrigerator, or constantly trip the breakers.
Generally, use ripping blades for ripping and cross cutting blades for cross cutting. Duh ! I know that there are many blades that can do both, however, if you insist on using a fine tooth blade to rip, it will only be a question of time before you suffer a kick back. Conversely, if you use a coarse toothed blade for cross cutting or detail work, not only will the cuts be jagged, there is a very good possibility that the blade will grab the wood, and throw it somewhere. It usually hits you before it arrives at its undetermined destination .
There are Teflon coated blades on the market that are supposed to make cutting easier and smoother. My only experiences with them, were less than satisfactory. While cutting, I suffered a severe kickback. It happened again on the very next cut. Not once, but twice within about two minute. I am a slow learner. This kickback was caused by the heat generated from the coating, and the thin kerf of the blades teeth. I have never used those blades for ripping again. Other cabinetmaker colleagues of mine have had similar experiences. These blades have, however, worked very well in my power miter box.
Planer blades do give you an excellent cut, and if used wisely, and kept sharp will cause you little trouble. They are very useful for detail work and light ripping. I caution you not to use them to cut heavy lumber, and be especially careful when cutting Alder or Poplar. These woods tend to grab blades.
The Cadillac of detail cutting blades is the Forrest 30 to 60 tooth. I say this because I have been using them for the past 20 years. They have no peer. They have consistently given me the cleanest cut over all of the others that I have tried. They happen to be the most expensive. However, when you consider the safety of these blades, the labor saved in less sanding, and chip out, they are more than worth it.
For ripping thick lumber, I prefer a wide kerf 9 tooth blade. The wider the kerf, the better. A lot of clearance reduces heat, allows for some movement, of both wood and steel, thereby lessening the chance for kickback.
The force required to push material through the blades really depends on the thickness of the material, its hardness, the sharpness of the blade, and motor HP. The feed rate should be steady, not a shove stop, shove stop. Let the blades do the work. If you find that there is a great deal of resistance, it probably means that the blades are dull. A good indicator of sharpness is the resistance and the amount of smoke pouring out from under the table saw. No amount of force will make dull blades cut faster. The danger here is the heat build up, and subsequent kickback. Another penalty for consistently using dull blades is the damage done to your motor. Continually overheating a motor will burn it up. Motors are not cheap, and replacing them is generally not much fun.
All of what was just said about cutting, applies as well to
dado and rabbeting work. Perhaps even just a bit more, since the set ups for
dado and rabbits require using multi- blade sets. This creates greater resistance
and therefore there is a tendency to over push material across the blades. This
is very dangerous, especially with saws of high horsepower. Low HP saws will
generally just stall out. High HP saws will throw the wood back at you. This
is generally painful.
An often ignored or forgotten caveat in the rules of cutting is the law of never
back up. There are times when we forget to raise the blade just high enough,
and in the process of cutting the board, the blade does not quite pierce the
wood. The temptation here is to pull the board, ie., go backward, to complete
the missed cut This is a very dangerous maneuver. Remember in which direction
the blade is traveling. By pulling the board towards you, you are now forcing
the blade to throw the board at you. It will do this with considerable force
and gusto. The solution to this dilemma, is to lift the board up and out of
the cut, and start over. Remember, to always push the material well past the
blade to finish the cut. Never take your hand, push stick, paddle, or whatever
off the wood until it is well past the blade.
This restriction of never backing up applies to cross cutting, especially when using the fence as a stop and the miter gauge to push the wood through the cut. Never back up. If you are just a tad, and I mean the tiniest bit off of coming straight back, the board will be grabbed by the blade. There is no telling where it will end up. Most likely where ever it lands it will have hit you first. Cross cutting any material is a doable thing, but never pull the cut piece back between the blade and the fence. And remember, whether ripping or cross cutting, never stop, never stop, never stop, until the whole board is well past the blade.
All that was said above must also be applied to cutting dadoes, and rabbets Never go backward. This is also true when cutting tenons. The temptation here is to go back and forth across the blades. Certainly it is much faster, but what a price for speed. On the back stroke, the wood is traveling over the blades in the same direction that they are going. If the wood catches, look out. The board will become airborne, heading on some undetermined trajectory. This will happen in the blink of an eye, and no one has reactions quick enough to escape the inevitable injury. It is a widely known fact, among table saw operators, that flying timber always hits the person who launched it first. It also has a good chance of hitting someone else before landing.
Ripping plywood is pretty straight forward. Just like ripping lumber, with this difference. There is little need to worry about severe bowing. The cross laminations of the plywood pretty well prevent this.
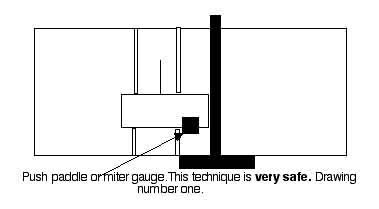
Now with regard to cross cutting plywood, there are a couple of things to be aware of. Firstly, it is safe to do so without using a miter gauge or a cross cut slide. Just use the fence, like you do for ripping. There is just one rule, and it is this. Never cross cut a piece that is longer than that which is against the fence. In other words, a piece that is one foot square, is fine, but one that is two foot long by one foot ,[against the fence] is getting into the risk zone. Remember our friendly lever. You need a lot of force to maintain total contact with the fence, this becomes very hard to do. This does not preclude using a miter gauge, or a cross cut slide, it applies just when you are trying to use the fence alone. See pictures one, two,three and four. .

When there is little clearance between the blade and fence, use push sticks and paddles to push lumber through, it is the only safe procedure, especially when there is any doubt about the characteristics of the wood you are cutting. There is nothing more exciting than a kick back when your hand is in close proximity to the blade. There are a number of commercial devices available. I prefer to make my own out of wood, because I go through them quite rapidly. They are continually used to push wood through the blade, and get cut up in the process.
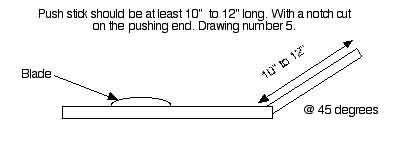
There are two angles that you must pay attention
to when using a push stick.The vertical angle by which you push a piece of wood
past the blade. The ideal angle is about 45 degrees to the table. No, you don’t
have to measure this angle, guess at it. This allows for enough force to push
the wood through the blade and at the same time keeps your hand far enough above
the blade to give you some margin of safety. This works very well with a push
stick of about 10-12 inches. A shorter length, to my way of thinking, is getting
into the hazardous zone. See drawing number 5.
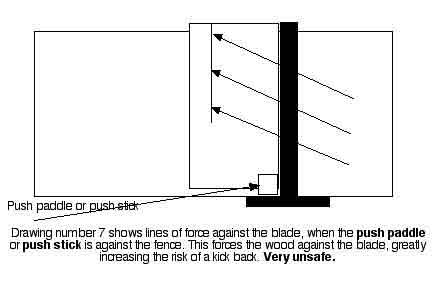
The other angle to concern yourself with, is the vector of force that is created by pushing the wood through the cut. Placing the push stick right up against the fence, will force the wood away from the fence, and into the rear of the blade as it is coming up. The ideal location for pushing the wood through the cut is, oddly enough, closer to the blade. I don’t mean close enough to hit it, just closer to it. This creates a vector of force towards the fence, keeping the wood against it, and therefore out of the rear of the blade. If wood is forced into the rear of the blade, there will be a kick back. See pictures 6 and 7.

One more thing about push sticks. Before you start the cut make sure that the push stick is on the saw near your hand. It will not do you any good in some far off place.You really do need it close at hand. The problem is that if, it is not near at hand, you will not be able to get to it at the most dangerous time, ie., your hand is right next to the blade.
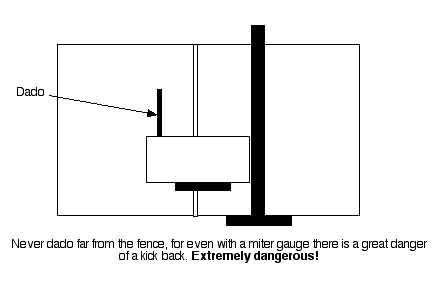
When dadoes are required further up the board and thus far from the fence, use a cross cut slide or the miter gauge to cut them. Never trap the board between the fence and the cutters. This will cause a sever kickback, and an injury is almost certain. Never pull the board back across the dado head. This is very dangerous. We get away with it often, however if the board has moved just the slightest bit, when you come back across the blades, [ remember that they are coming up], they will grab the board, and cause it to do weird things.
All of my saws are equipped with the longest Beisemeyer fences made. This, of course, causes some consternation amongst some of my colleagues, who feel that short fences are better. My response to this is “nuts.” When you are pushing a long board through the blade, there has to be fence support for the board well beyond the blade, in fact it is more important that there be support at the end of the cut, than at the beginning. Why? Because at the end your hands are in much closer proximity to the blade than at the beginning of the cut. Short fences allow the wood to drift away from the fence, just when there is the most danger to the hands. Imagine cutting a sheet of plywood with a short fence. All is well except for the last 3 feet of the sheet, when it starts to drift away from the fence, and you are trying to maintain force against a nonexistent fence to keep the cut in a straight line. One of the most important factors in preventing kickback. is to keep the board against the fence. When the board drifts away from the fence, it is headed right for the rear of the saw blade. Witch, by the way is coming up from the depths of hell with an attitude problem, and an “I’m going to get you” sign written on its teeth. See pictures 6 and 7 for a refresher look at the dynamics of board against fence requirement.
All table saws come equipped from the factory with
table saw guards and splitters. Let’s talk about the splitters first. The
splitter is designed to keep the board from clamping onto the blade, which helps
prevent kickback. It also helps prevent kickback. by not allowing, the wood
to catch the back of the blade. Why is it then that, in virtually all of the
cabinet shops and wood working facilities that I have been in, I have yet to
see them installed? There are reasons for this. With lumber that tends to bow,
boards tend to clamp onto the splitter and won’t let go. This does help
prevent kickback. Well you say, that is what it is supposed to do. Right, but
in a real world shop, where you are trying to get product out of the door, stopping
the machine, spreading the kerf with a screwdriver or wedge to free the trapped
wood every time this happens, is a bit frustrating. I know that this seems to
go against Lowering the Odds, however, a more certain way of preventing the
board from clamping itself to the saw blade, with the resultant kickback. is
to be totally aware of what the wood is doing. At the slightest hint that a
board is bowing, and that a kickback. is imminent, lift the board up above the
blade, ie, out of the cut, and begin to make the cut again. This will widen
the kerf and eliminate the board’s death grip on the blade, and splitter.
This is both safer and faster, or you can use a power feed for those recalcitrant
woods.
In most cases, when there is danger of substantial bowing, using a band saw
for the initial cuts is not only your safest bet, but probably much faster.
I have had some colleagues tell me that their solution to wood grabbing the
blade is to install higher horsepower motors to power their way through the
cut. This will only succeed in propelling the timber faster and further past
you.
Another reason for taking the splitters off, is simply that a splitter must be the same thickness as the kerf of the blade you are using. It has been my experience, that most blades are different than this thickness. This causes great anxiety for most saw men, because every time a blade is changed, it is anyone's guess as to whether the blade will cut a kerf wide enough to allow the passage of the wood past the splitter. I have found that they usually don’t. You see, for the splitter to truly work, it has to be pretty close in thickness to the blades kerf. If it is to small, it will not work properly, and if it is to thick, the board will not go past it. This dimension is difficult to measure before cutting, because the tolerances are so close, and wood does move.
The European style of splitter, is mounted directly behind the blade, and is curved to match the arch of the blades diameter. This allows much more flexibility in cutting requirements. Further more, they are considerably easier to adjust for saw kerf.
Now table saw guards work fine when you don’t need them. When you are cutting plywood or long boards with wide dimensions, your hand is nowhere near the blade, and therefore pretty safe. It is when you have to work close to the blade to accomplish detail work, like ripping thin strips, cutting grooves down the edge of a board, doing dado work, cutting bevels, etc., that saw guards become in fact more hazardous, than doing without them. I know they are designed to protect our hands, and to do that they prevent the total practical utilization of the tool. I have examined almost all of the blade guards, and find that some are hazardous in themselves, and others while allowing some detail work, truly don’t allow full use of the machine. I have not seen them used in any of the cabinet shops that I have visited. Where you do see them installed, are in those shops that have government regulations requiring them. The safest guard is knowledge. Knowing your machine. Paying attention to its sounds, and learning its idiosyncrasies, will in the long run protect you better than a guard and splitter that will at best give you a false sense of security. Now having said all this, it maybe that for the total novice, keeping the guard and splitter in place for awhile, to give you a chance to learn about the tool, is not a bad idea.
Obtaining this knowledge is the difficult task. Where do you get it? How about taking classes? How about becoming an apprentice? Reading books and articles like this. Joining wood working groups, where you can learn from others. This can sometimes be bad advice. Whatever your goals are in wood working, there must be some effort on your part to learn how to use the tools. Learning can be hazardous, if you try to do something on your own, it could become an expensive lesson. Let me put it another way. If you really make a big a mistake using your computer, what is the worst case scenario? You lose the page? You lose the whole article? Perhaps a book? If you make even a tiny mistake on the table saw the consequences are far greater. Digits don’t grow back. Yet we will spend both time and money to learn how to use a computer, but not a nickel to learn how to use the saw. Just open the box plug it in and turn it on, Macho man. Remember our 5 lanes of traffic.
Losing digits, is both painful and tragic. It makes us less competent in the use of our hands. However, the lose of our sight creates an entirely different, and much more severe limitation. There can never be enough said about protecting your eyes. Nothing you ever do will be worth the loss or injury to your eyes. Always wear eye protection! Whether you are cutting or just looking around the shop. Things fly around in wood shops, and they can come from anywhere at anytime. This is especially true when cutting plastics or very hard woods. Tiny chips come off the blade and they can literally stick in your face. Have you ever noticed a missing tooth on a carbide tipped saw blade? Where did it go? Regular glasses, are better than none, but they don’t keep stuff from flying in from the sides. Use wrap around glasses, and what is even better wear a face shield. This will protect both your face and your eyes.
I was cutting a lot of plastic on my table saw, and as usual was wearing my dust helmet, which has a hard visor in the front. Unbeknownst to me, as I was cutting the plastic, there was heat build up in the saw dust which was causing the plastic dust to fuse together. This was taking place just under the table saw insert. After about 2 hrs. of cutting this glob broke free, and was caught by the blade, which propelled it straight up. The glob hit the insert with such force, that the insert was dislodged and promptly caught the blade, which threw it straight up and at me. All I felt was a thunk, in the front of my helmet, and was not immediately aware of what it was that hit me until I noticed the hole in the saw table where the insert had been. The insert had carved a grove in the visor of my helmet, which would have been my face, had I not been wearing protection. It took about 20 minutes to find the insert, for it was about 50 feet from the saw.
Working in a dark place can be very harmful to your eyes. To see properly you need not just adequate light but excellent lighting. Eye strain, and headaches can be caused by improper lighting. Additionally, if your light is not bright you will fail to see most of the sanding scratches, and tool marks on your work. That is until you bring it out into the light of day. What you need to look at are what kinds of light works best. There are certain types of fluorescent bulbs that work very well, ie. give more light for less wattage. I went to a demonstration at the Southern California Edison Co. that showed what a difference the right kind of light bulbs could make. The differences were dramatic. Get expert advice on this, it will really pay, in both better lighting and a lower electric bill. If you can, install skylights. In my new shop, sky lights were installed, and the natural light allows me to work all day without the use of the fluorescent lights that I also installed. This is lowering my electric bill considerably, and providing me with the best lighting conditions possible. Unfortunately, I still need to use them at night.
Dust is both an irritating and dangerous byproduct of wood working. This is especially true when working with most tropical species. Some of our domestic trees are equally culpable. Remember always that the tree from which the wood you are working with, survived in the forest or jungle only because it has something in it , that the bugs don’t like. This something is probably the equivalent of a few gallons of Black Flag insect killer. The dust created when working with wood, and containing all of these chemical protectors, are what you are breathing when you work without dust protection. Let’s give a couple of examples. Pine contains distillates from which turpentine, varnish, and in the old days, ship’s tar are made. Oak, for many years was the source of tannin which was, used in the tanning of leather. It is widely known today, that most of the tropical hard woods contain carcinogenic chemicals. This is what you are breathing, when you don’t protect yourself. For the casual wood worker, [cuts a board once a year,] you probably have nothing to worry about. However if you are working in a dusty environment everyday, you must protect yourself from the exposure to these very lethal hazards.
Press board, MDF, plastic laminates, etc., all contain whole categories of hazardous chemicals, that when cut and sanded, turn into fine particles that you breathe. This is not something to be Macho about, dust protection will prolong your life. Cutting and working with spalted woods creates a different kind of threat. The molds and fungi that discolor wood, are very happy to find a new home in your lungs. Their residence there is the perfect environment for growth, and can become a debilitating disease.
Cleaning up under your table saw, is a mundane, boring, dusty, dirty job especially for the older machines, that do not have front gates or doors for easy access to extract the saw dust and other stuff that accumulates under it. No matter how nasty and dusty a job it is, it has to be done, and done frequently. Mostly because it is a fire hazard. This dust is very fine, and if you cut plastics and other such stuff, the dust from them are very flammable. Well you say, how can a fire get started under my table saw? Have you ever accidentally cut through a nail? Did you notice all those pretty sparks? Guess where they were going. How about that dull blade that you have been meaning to change, but are still using, which is pouring a stream of burning saw dust down under your saw. I had a smoldering fire start this way.
I have seen saw dust accumulations up and over the blade port, in which case, the saw blade was acting as a particle beam accelerator causing dust to fly out from under the saw in a constant stream of debris headed directly for the operators face. This is a definite indication that a cleaning is necessary. This level of dust creates a danger to the motor as well. Electric motors do not like dust, and no matter whether it is a TEFC or not, saw dust gets packed around it. This generates a lot of heat that cannot be dissipated, causing your motor to suffer an early demise from either a fire or overheating. This is expensive, a waste of time, and it usually happens right in the middle of a project that must be delivered tomorrow, with no motor stores open because it is a Holiday.
If you work in an environment where machines are constantly running, and you have to yell to be heard, chances are that your hearing will start to go. Eh, what’s that you said? Routers are especially noisy. If I forget to put on ear muffs, after about ten minutes I go numb. Make it a point to wear ear muffs or plugs, or pretty soon the whole neighborhood will be hearing your T.V. programs and sharing in your family discussions.
It is imperative that you create a zero clearance table saw insert for each blade that you use. This is necessary to prevent tear out. Look at it from the blades point of view. When it makes its complete rotation through the wood, it can either cut or tear its way past the remaining material as it comes out of the bottom of the cut. Whether it cuts its way or tears its way will depend on if there is support for the wood fibers by the table saw insert. With zero clearance between the blade and the insert, the blade has a chance to cut its way past the remaining material without tearing out. If there is more than Zero clearance or any gap then the wood is not supported and there will be tear out. The wood has to be supported throughout the cut, to prevent tear out. Even a moderately dull blade will tear out far less, with a zero clearance insert.
The requirements for dadoes are the same, perhaps even more so, because of the larger amount of material being cut out and removed. Each dado size that you use should have its own insert. This is especially true when dadoing veneered plywood. Veneer is glued to a subsurface with just the right amount of glue, and sometimes not. As the dado blades come through, without the support, of a zero clearance insert, tear out is guaranteed. We all know what this means. Lots of hand work with putty and sanding. I recommend that you use dado sets with solid blades. Two brands come to mind, Forest and Systematic. Not the so called wobble types. Reason one for this, is that the insert for these types of cutters has to be very wide giving you no zero-clearance advantage. Secondly, because there is such a wide gap between the blades and the inserts, things can fall in, like the board you are working with. This makes for an exciting couple of seconds as you watch your work disappear down into the bottom of your saw.
Here’s how to make and install zero-clearance inserts. Make a pattern from an existing insert. Cut and shape a new insert from the pattern. Work on it until it is a press fit into the table saw insert opening. Most of the time the thickness will be one half inch. Find some scrap Formica or other laminate brand, and spray contact cement on one side, and the up side of your new insert. Wait about l5 minutes, and press them together. Route the Formica or sand it to the insert. Make a metal clip or a wooden one so that the insert will not come flying out of the hole. Drill a hole about one inch in diameter, in the front of the insert for a finger pull. Don’t drill it where the blade will cut through it. Now place the insert into the opening. Place the table saw fence over the insert, but not where the blade is going to come through. Turn on the machine, and slowly raise the blade through the insert until lit reaches full height. This is a zero-clearance table saw insert. The drawings below are 10 and 11. They show an insert with a metal clip on the left, and on the right the blade kerf, and finger hole.
Perhaps the most important reason for installing zero-clearance table saw inserts, is to prevent things from disappearing down the slot. On most table saws that I am familiar with, the gap in the factory installed insert exceeds 1/4 of an inch. This is because the factory insert has to do for cutting angles, as well as straight on ripping. This is generally ok, however try to rip thin strips of wood for banding etc., then see what happens. These thin strips tend to disappear down the slot. This can be a pretty scary thing. If by chance one of these thin strips gets partially stuck in the slot, do not, I repeat, do not try pull it out while the machine is on. Turn it off first. If you try to pull on it, there is a good chance that the blade will grab it and pull your hand into the blade.
Aligning the table saw fence so that it is perfectly parallel to the blade used to be a pretty tricky task. However with the new style fences, micro adjustments are easily accomplished. The thing to look out for is a toe in towards the blade. This is a real no no. Perfectly parallel, means just that. It takes some practice. A toe in toward the blade will cause serious binding and kickback. Perfectly parallel will not. There is an even better way, and that is to have the fence toed out just a tad, about l/64th of an inch. This is hard to measure, however there is an easy way to do it. Set your fence at any given distance from the blade. Let's say four inches. Make a cut in a scrap piece of wood about 2” or 3” long. Stop the machine, turn this scrap block upside down and place the blade into the kerf of the block at the back of the blade, and flat on the table. You can now see how much to adjust the fence, toe in or toe out. The reason for this clearance is that it will greatly reduce any binding caused by material bowing or steel expansion. It will help prevent wood becoming entrapped between the blade and fence. This amount of clearance will not significantly hinder the cutting of straight lines or interfere with other more demanding detail work.
Perhaps in heaven, there is a table saw of such exacting quality that the miter grooves are perfectly parallel to the blade, and furthermore stay that way. This is perhaps, one of the most difficult and frustrating adjustment jobs required of any woodworker. There are usually four bolts that hold the table top to the base. The trick here is to loosen them, make your adjustments, using a dial indicator, running back and forth in the miter grooves, and then tightening everything up without having anything shift. You can get by without a dial indicator using a square and your miter gauge. No matter how it is done, it must be as accurate as you can get it. Now, once it is set, it probably will not have to be done again for quite sometime.
This accuracy is necessary because everything that you cut using a miter gauge or a cross cut slide depends on the parallelness of the grooves to the blade. Being off just a tiny bit can throw all of your angles into the third dimension. This will cause you no end of frustration. Trust me, it is better and far more easier to make the adjustments to your table top.
I have read books and instructions that insist on cutting severely cupped boards with the cupped [concave] side up. I don’t understand the logic of this. When the cupped side is up the board sort of wobbles its way down the saw. Rocking would be a more descriptive word. Where is the control here? Does this rocking your way down the saw appear or feel safe? Picture 10 shows the proper way to place a cupped board on the table for ripping or cross cutting. If the cupped [concave] side is down, the board is resting on it’s edges and can’t wobble or rock. Now, I know what you are about to say, that when the board finally is pushed past the blade, and the board comes down, won’t it grab and cause a kick back? The answer to this is yes and no. Certainly it has the potential for a kick back, at least for a brief moment, but because we are ready for it, it doesn’t get the chance, and because we are using a wide kerf blade, the board doesn’t get a chance to bind. I feel much more at ease, or as much at ease as you can ever get operating a table saw, when the cupped side is down.
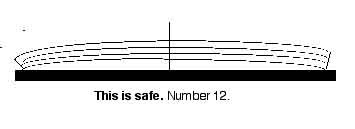
Drawing number 12 shows the cupped, [concave] side
down. This is an exaggerated view of the end of a cupped board. The lines represent
growth rings. To rip a cupped board safely, always keep the cupped side down.
The vertical line represents the blade, which is high to clarify the cutting
technique.
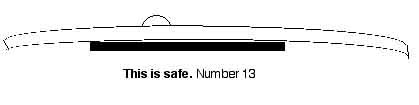
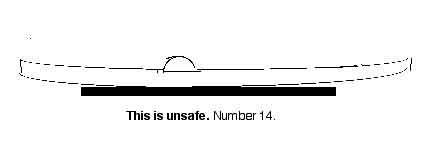
There is another kind of cupping that I will deal with right now. I call this
a bow. That is a concavity down the length of the board. This bowing should
always be down when ripping or cross cutting, for if it isn’t the pressure
required to keep the board on the table surface becomes quite severe. As illustrated
in drawings number 13 and 14. Blade is high to illustrate the technique.
When I have a truly severe cup, or bow, I go to my band saw and cut the board there first. This greatly reduces any of the dangers described above. It is a very safe way to eliminate the problems normally associated with cutting dangerously cupped boards. One other thing. Cut the longer boards more or less to length, before ripping them. This will make things a lot easier to handle, and less dangerous to cut.
Never rip a board without having a straight edge to work from, ie., against the fence. Always joint an edge, or straight line an edge, however you do it, don’t start ripping without a straight edge. The consequences of attempting this can be quite severe. The board will follow the outside or fence edge, and if it is curved, will force the board into the back of the blade causing a kick back. Without a straight edge, against the fence, it is just not possible to make a straight cut, or avoid a kick back.
When ripping or cross cutting you must keep pressure against the fence. Your eye must never leave sight of the board against the fence. Failure to keep pressure against the fence is a sure way to have a kick back.This is probably the number one cause of kick back, and the least understood. To help keep pressure against the fence, you must stand off to the left of the blade. This gives you an angle of attack, and creates a vector of force against the fence. If you allow the board to creep away from the fence it is forced into the back of the blade, which is coming up, and forces the board up and across the blade. Remember where that blade is coming from. See pictures 6 and 7 on page 6, for a reminder on vector force lines.
Always stand to the left side of the blade when cutting. Reread page one. It always amazes me when I see people standing directly behind the board they are cutting. This is very dangerous! If that board binds up it will come straight back, on it’s way towards the rear. It will not stop and wait for you to get out of the its path. One friend of mine watched in utter amazement as a board he was cutting propelled itself through a door, on its way across the sidewalk, and into a car parked on the street. By the way both doors were locked. Stand off to the left side of the blade. The board you have to worry about is the one trapped between the fence and the blade. Additionally, any chips, including carbide tips, and saw dust that are flying off the blade will go past you as well. The cut off is not going anywhere.
This is one of the most difficult things to convince table saw users to do. Build a large table for support. No matter what kind of material you are cutting, there is absolutely no way that you can push it through the saw without plenty of table support. If the board is 8’ long and the table saw support behind the blade is only 7” or 8” then the amount of force required to keep the board flat on the table and in the cut becomes substantial. So much so that if anything happens you are so out of balance, that you cannot react correctly or swiftly enough to prevent injury. It is, therefore, absolutely essential that your table saw be equipped with a surround table. Don’t yell and scream, that there isn’t enough room in the garage. Read on Horatio. This table can be a permanent one, for those of you with enough space. Build it long enough and wide enough to meet almost any contingency. Consider the weight, width, and length of a sheet of plywood for instance. It can be a temporary table, composed of movable parts, ie., work benches on wheels that can be moved into place when needed. Or it can be an attached lift up table, with folding legs that drop down, and lock into place when needed. However you accomplish the assembly of your table, it has to be done.
All of you have seen those little stands with a roller on them. They are advertised as a solution to the above problem of supporting work. The answer is very easy, they don’t. To set the height of the roller so that the board clears the top, it , the roller, has to be set much lower than the table saw, which defeats the whole purpose of having it in the first place. If you set it just right, the roller gets knocked to the ground. This generally causes a certain knee jerk kind of reaction. By setting the roller to the table saw height it will invariably get knocked over by any board trying to pass over it. I think Murphy has something to do with it. Actually, it has to do with the bending moment of wood.
Another problem is that the roller has to be at a perfect right angle to the blade, or the board will veer off to one side or the other. This usually elicits some expletive that is considered shop talk. Shop talk should never be used at home, or in the house.
Never have a helper at the other end of the board. I know that this is commonly done. With no support behind the blade, it just seems like the right thing to do is to call your wife out of the house, or the neighbor from next door to hold up the board as you push it through the blade. The problem with this is that the person on the holding up end, only has to move just slightly in either direction to force the board into the blade. After all this is just a long lever, and just the merest amount of movement will cause trouble, possibly forcing your hand into the blade.
Coupled with a large table saw table, there needs to be a cart or movable platform to stack materials on. The height of which is more or less the same as the table saw. Stacking plywood, press board, or lumber where it is easy to move onto the table saw will save you from many a sleepless night caused by a sore back.
Let us now deal with the proper attire for working around machinery. These rules apply generally to all areas where there are revolving or moving parts. I think that it goes without saying, long hair around machinery is going to get you into trouble. Remember our 5 lanes of traffic. You can get away with it for awhile, but sooner or later, you will get caught, unless you tie it back so that there is no possible way for it to come undone, [fat chance]. Perhaps you could tuck it under a tight fitting helmet, hat, or under your shirt, or even under a jacket. The consequences of having long hair catch in moving machinery is quite severe and painful. Think of scalped. There was a story in the newspaper and on the radio a few years back, about a woman who worked in a factory, whose long hair got caught in a machine. The result of her entrapment was a scalping that began at her eyebrows, and lifted her scalp all the way past her ears. This is a pretty stiff price to pay for the vanity of wearing long hair, especially where it does not belong. I am sure that she was warned innumerable times to keep it short, or tucked out of the way. This is not question of personal rights, but of safety, yours.
Another thing that gets caught continually, is loose clothing. So always tuck your shirts in. Roll your sleeves up. Tie your shoe laces. Button your shirt. Tuck in your tummy. Stand up straight. Kind of sounds like my mother.
Shirt pockets are another danger, mostly because of the stuff we put in them. As we bend over, everything tends to fall out, right over the blade, the lathe, on the floor, on the fresh wet coat of varnish, etc. This is dangerous, for when things fall out we have a knee jerk reaction to this. We try to grab it before it can fall out. I watched a table saw operator grab for a pair of glasses that fell out of his shirt packet, directly over a l6” blade set at 4” above the table. He cut off 3 fingers.
Additionally, when we empty that shirt pocket, usually in the bed room at night, all of the sawdust and shavings from a nice day in the shop, come tumbling out all over the pristine floor. This wins great praise and adulation from” she who must be obeyed.” No matter how beautiful the project we have just completed is, it will always be remembered for the litter on the floor, and not its fine craftsmanship. This is hard for men to understand.
Ties, necklaces, and rings are examples of other things that should never be worn in any environment where there is moving machinery. This should be patently obvious. You would be surprised at how many people are totally oblivious to the consequences of wearing rings. I want you to think in terms of filet, for rings. That is your ring finger. What would you prefer, my dear, with or with out. I met an orthopedic surgeon back east somewhere, who told me that he appreciated my stressing safety during my demonstration. He then told me, since I was wearing one, that rings caused about two ring finger amputations a month at the hospital where he practiced. I have not worn my wedding ring since. If you insist on wearing a neck tie or a necklace, visualize, strangulation.
Another no, no, is wearing gloves. They are very useful when loading lumber, digging in the dirt, pulling your Great Dane on it’s evening walk, or boxing. In a workshop with revolving machinery, they catch, and this they do well. Of course, what the machine catches, has your hand in it.
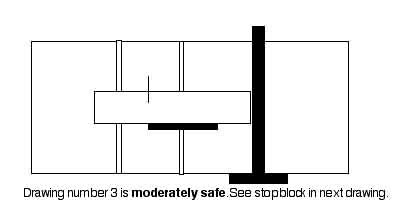
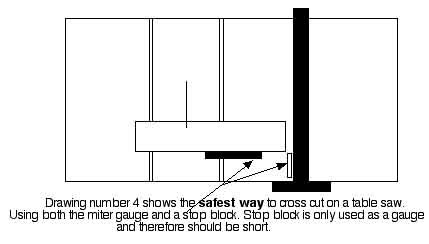
Never cross cut lumber using the fence as a stop. [There is a way, read on Mc Duff.] Use a miter gauge. Always use the miter gauge between the fence and the blade. This will help keep the board from twisting towards the blade. Remember that the board is another lever, and the further you are from a positive support point, the easier it is for the board to fly. The danger here is that the cut off will become trapped between the blade and the fence. This must be avoided period. Using stop blocks clamped on the fence will help prevent trapping, and still allow you to cross cut accurately and safely. Refer back to drawings 1,2,3, and 4.
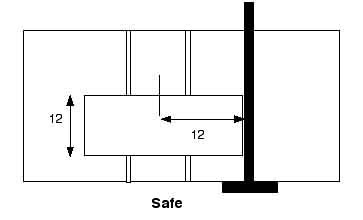
Drawings number l5 and 16 more clearly illustrate the ratios of width to length for cross cutting without a miter gauge or a cross cut slide. Generally a one to one ratio is safe. Exceed this ratio, with risk. For instance a 12” by 12” is very safe, however a 12” by 24”, and you enter the risk zone. The forward force required to push the wood through the blade, creates a pressure at the blade, which tries to pull the board away from the fence. See arrow at the blade. Force where board and blade meet.

The force required to hold a board against the fence exceeds your ability to do so. It is therefore necessary to use a miter gauge or a cross cut slide. Drawing number 17 illustrates a cross cut slide.
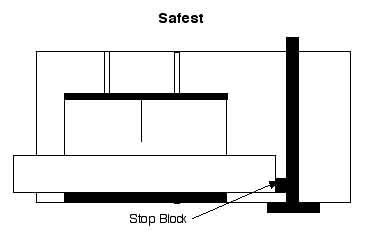
A safer way to use the table saw for cross cutting, is to use a cross cut slide. It can be built to accommodate a number of widths, and can include stops for accuracy. It can also be set up to cut angles and compound miters. In this instance the fence can be used as a stop, provided stop blocks are used on the fence. Stop blocks can also be used on the slide itself. See drawing 17. This illustrates the safest way to cross cut on a table saw.
There are two practical ways to cut tenons. Vertically,
or flat on the table. I have seen tenoning jigs used innumerable times, and
they always give me the willys. Mostly because the wood is held in the fixture
vertically to the blade. This is difficult because you are attempting to cut
the hardest part of the wood, that is the end grain of the board. This offers
a lot of resistance, causing potential grabbing of the wood by the dado or blade.
Certainly if this method is used make sure that all of the fixture’s hold
downs are securely tightened. Another cause for concern, is the large insert
opening. Especially when a dado head is used. This does not give the vertical
piece any support other than the fixture itself, and sometimes that is not enough.
A zero clearance insert might help, but the odds are, that sooner or later,
if anything slips, away it goes. Having said all this, never try the vertical
method without using a fixture. I tried it once, without a fixture a long long
time ago. Thought I was going to save some time. Fourteen stitches in my chin
for a nick of time.
On the other hand, you can cut all of your tenons, using a dado set, with the
board flat on the table, a stop block clamped to the fence, and a miter gauge
to hold it. There is very little danger, and accuracy is assured using this
method. This is also the fastest way to accomplish tenoning on the table saw.
A cross cut slide works well here also. Remember, never back up.
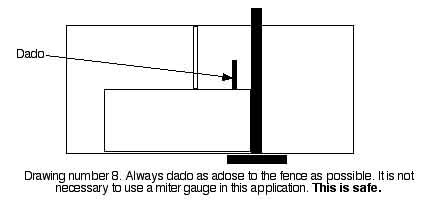
Cutting rabbets should always be done as close to the fence as possible. Pushing lumber, especially plywood, or other wide stock, using the fence alone is perfectly safe, as long as you are next to the fence, or reasonably close to it. You do however, need to keep your hands a safe distance from the cutters. Because the lines of force tend to throw the wood away from the dado head, you are reasonable safe doing this. You can also use a miter gauge, or a cross cut slide. This technique can also be used in cutting dadoes. Keep moving the wood so that you are always as close to the blade as possible. Remember, never back up. Refer back to drawings 8 and 9.
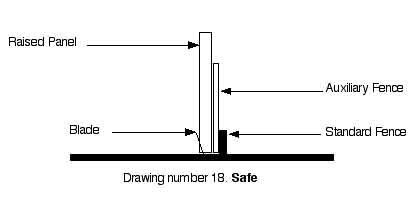
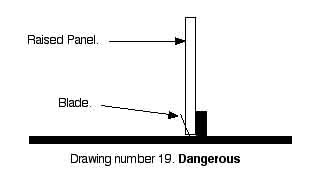
There are times when we want to cut long bevels on wide boards in order to make raised panels. In order to accomplish this safely, it is essential that you attach an auxiliary fence to your standard fence. It can be attached with clamps, if the raised panel is not to large. If it is large, then attaching it with screws or bolts may be necessary. This auxiliary fence must be of a height and width that will give you a firm hand hold on the piece that is going to get beveled. See drawings 18 and 19.
Cutting 45 degree angles along the edge or the end of boards is an important part of the total utilization of the tool. Let’s look at the proper way to do it., by using some drawings to illustrate the techniques. Blade height much higher than wood for clarity. Drawing number 20.
In drawing number 20, the blade is tilted to the right. This traps the wood against the fence. Never do this without a push stick, or push paddle.
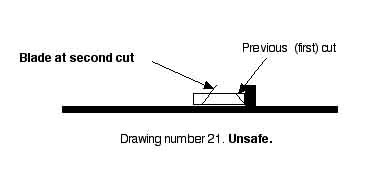
In this drawing, number 21, the previously cut angle is against the fence, however it’s pointy edge is down. Pressure from the blade will tend to force it under the fence. This makes for an exciting cut, since it is impossible to keep the wood straight and against the fence. Additionally,since the pointed edge, is forced under the fence substantial resistance is created. A better way to accomplish this kind of cut is to put a piece of 1/4 plywood down on the saw table, make a partial cut, and then put the piece of wood that you want to cut on top, and then push it through.[ Remember to adjust your fence the same thickness as the piece of plywood.] This will avoid any binding, under the fence, because the 1/4” ply raises the piece so that the pointed edge is now riding totally on the fence. The board is still trapped between the blade and the fence, so care and caution must be exercised, and push sticks and paddles used.
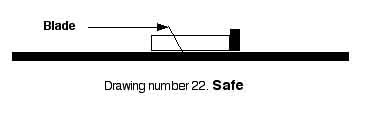
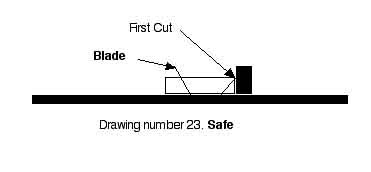
A much better way of avoiding this problem all together, is to use a saw that tilts away from the fence, ie. to the left. It is a much safer way to cut 45’s. Because the wood is not trapped between the blade and the fence. See drawing number 22 and 23.
In drawing number 23 below, you can see that the first cut is not riding under the fence, but rather, is riding along it. This is much safer, the because the wood is not trapped by the blade against the fence, and the pointy end is not trapped under the fence.
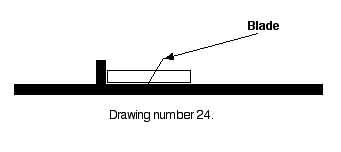
Another alternative is to set up the saw as a left handed machine. This allows cutting the same way, except from the left side of the blade. I t helps to be ambidextrous. See drawing number 24 below.
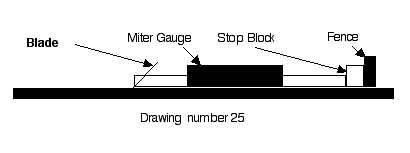
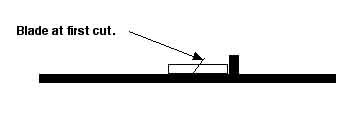
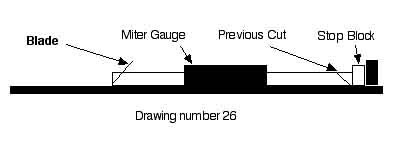
When the blade tilts to the right, using a miter gauge to cut end miters is safe, as long as you use a stop block on the fence. See drawing number 25. Of course, you can mark your boards and do without the fence altogether. This will probably cause inconsistencies in the length of the boards. The real problem arises, when you attempt to do the other end because the pointed end is now down, and will try to go under the stop block. See drawing number 26. So we do as we did when ripping, use a piece of 1/4 “ plywood to raise the pointed end up so that it will ride totally on the stop block.
Again there is another alternative, which is to use a saw that tilts to the left. Or, as in drawing number 24, we can pretend that we are left handed, or ambidextrous and cut from the left side. This takes some getting used to. No matter how you do it, a miter gauge, combined with stop blocks must be used. Also remember that the cupped, [concave] side must be down.
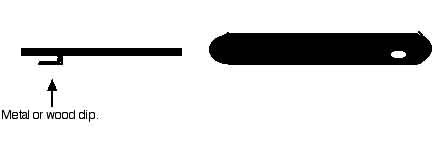
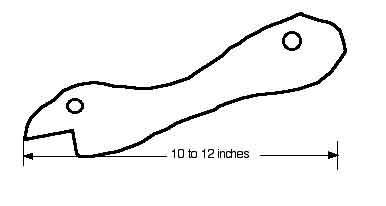
I have talked a lot about using a push stick. Below is an attempt to draw, the type of push stick that I use. It is usually about 3/4” thick and 10 to 12 inches long. I use mostly pine and other soft woods to make them. The shape is sort of like a shark, a constant reminder of what the saw blade actually is. One hole is the shark’s eye, and the other is to hang the push stick on the table saw.
All of us have acquired bad habits that we must change. It seems that most of them cause us to flirt with disaster, while we are really not aware of how serious the danger is. For instance, and we all do this, wipe dust and shavings off the of the table while the blade is running. I know that this sounds ludicrous, but I see it all the time, and often do it, myself. We all know better, and yet....
Another thing we all do is to remove cut offs from the table near the blade while the blade is still turning. They are not going to get up and run away, so why not wait until the blade stops before clearing them away? It seems that we just can’t stand to see those little pieces of wood lying there. We have to move them as soon as possible, for what reason I know not. It seems to be an automatic reflex, got to get them little fellers. A corollary to this is where we put those little bits, on the floor of course! This is guaranteed to turn our ankle when we step on them. An additional corollary, is never grasp the sliver of wood that has trapped itself between the blade and the table saw insert. If you grab for it, that is just the time that the blade will also, and it will pull your hand into the blade, or slice your hand as this sliver of wood gets sucked down under the saw. One of my students impulsively grabbed for one of these thin strips, and only sliced her finger, as the blade pulled the sliver of wood down under the saw. She was very lucky!
Never talk and try to operate the saw at the same time. Operating a table saw requires your full and undivided attention. Trying to carry on a conversation, while operating a table saw, is a lot like trying to drive a car without looking straight ahead. If you carry on a conversation in a car and continually look away from the road, the odds are that sooner or later you will crash. And so it is with the table saw. No conversation you could ever have, will be important enough to risk your digits. If you are distracted, for even the briefest of moments, you are bound to eventually suffer an injury. Remember we are trying to Lower the Odds.
Never make unnecessary loud noises, especially in a shop where there are other people working. It could startle someone, and cause an accident. Noises, like dropping boards on the floor, slamming a board on a work bench, popping a paper bag, coming up behind someone and saying, boo! Yelling across the shop in a basso profundo, when it is dead quiet. How about yelling into a garage work shop, hello is anyone in there? Loud noises can cause an accident particularly when someone is working alone, because they are not expected. Never creep up on someone while they are operating a machine. Wait a good distance away, until the operator has a chance to see you, or until he stops what he is doing.
Wear shoes befitting the task. I have seen students and pros come to the shop ready to work in sandals, go-aheads, tennis shoes, etc. Unbelievable? Yes but sadly true. The painful fact is, that until you drop a clamp on your tennis shoe shod foot, you have no idea of the danger you are in. Good foot wear is essential for safety, for even a small board has enough mass in it to cause pain, dropping from just the height of the work bench. How about sharp chisels? Remember, according to Murphy, sharp chisels always land pointy end first. I am not advocating steel tipped shoes, however this is not a bad idea. Certainly, at least, a pair of substantial leather work shoes. This only seems to make sense considering the environment. Remember our 5 lanes of traffic.
Never stand behind the table saw as an observer. Never walk behind a table saw while someone is using it. I am constantly amazed at students who seem to be challenging a board to come flying out at them. Standing directly behind the line of fire is just not a wise thing to do.If you want to observe a saw being used, stand out of harms way. It is also disconcerting to the operator, and might cause him to lose concentration. Enough so that he might suffer an injury.
Never work when tired. This is an axiom as old a Pythagoras. Yet we all do it. My only serious injury occurred, because I was to tired to understand that what I was going to do was very dangerous. This is a very important point, and I know that I have already discussed it, but it bears repeating. When you are over tired, you cannot think straight, and you are apt to make mistakes that you normally wouldn’t. Any mistake made on the table saw can be a serious one.
Now, l know that I don’t have to tell anyone this, but I have had students come to class after dinner with alcohol on their breath. Can you imagine? It does not take a great deal of booze to numb your senses enough to cause an accident. If you drink, and I mean just a beer at lunch, and then go into the work shop to get something done, eventually, you will end up in the emergency room. If you drink, don’t use machines. It is just that simple.
Let me conclude this with a bit told to me by an emergency room doctor. He told me that most home shop accidents seemed to occur just after football ended on Sunday afternoon television, and that most of the injured admitted to watching a game and having a couple of beers. To further emphasize his remarks. I had a student arrive at class who began to plane a table top with a Makita 6” power planer. I knew he knew how to use the machine, and was taken a bit by surprise, when another student told me to check on him. I went over and took a look at what he was doing. He was planing all right, but in the same place. From a 1” board, he had planed one end down to about 3/8 ths. I suggested that he stop, and he became quite belligerent, and insisted on continuing. That is when I smelled the booze. I suggested again that he stop, he reluctantly did, packed up, and never came back. If anybody sees a Mahogany coffee table with a....
One habit that I have had a hard time changing is using my thumb to push boards past the blade. If the board is wide enough, push it through using the heel of your hand, or a push paddle. If the board is so narrow, that your thumb is required, use a push stick. Now if you are using your thumb because, you can’t find your push stick, STOP THE MACHINE AND FIND IT! The reasons for this are manifold. If you have kick back, and all you have to hold the board down is your thumb, guess what? You now have a very sore thumb. The knee jerk reaction to an episode of this nature is usually some expletive like oh drat! It could even be much worse. If you have a kick back, you will probably lose your thumb, and if, by some twixt of fickledom, you don’t, consider yourself a verrrry lucky person. Yes, it is that simple.
Now this may sound a bit unbelievable, but when you adjust the height of the blade, do you sort of bend down and sight the blade next to the wood while the machine is running? I have seen this innumerable times and go into orbit each and every time. I even had a student kneel down in front of the saw and crank up the blade while it was running, in the middle of a cut, without holding onto the board! This totally defies common sense. I literally chased that student out of my class. You are providing a target for whatever the blade chooses to throw at you. Probably that piece of wood. This could cause a severe injury to your face, head, eyes, or nose. Just don’t do it
Another thing that we all do at one time or another, is to leave a machine running while we answer the phone, walk across the shop to confirm a measurement, get a tool, or just forget that it is on. This is not a good thing to do, and a habit that must be broken. This is especially true in shops where there are more than one person working. In a classroom or a busy cabinet shop, for instance. In my shop, I have a big dog that loves to jump up on tables to keep me company while I am working. Work tables, dining room tables, table saw tables, he doesn't know the difference. If I inadvertently left the blade running, there is the possibility that my dog, would be seriously injured. Always turn off any machine that you are running, whenever you have to leave it. Even if it is only going to be for a couple of seconds. This is especially true for you home shop woodworkers. Children love to play in daddy’s shop.
After you have pushed the board through the cut, and past the blade, there remains the requirement of picking up the board and lifting it off the table. Do not under any circumstances drag the board over or near the blade. If it slips out of your hand, it will become airborne. It will launch itself straight back and hit you. Now I know that you have never had this experience. Trust me, you don’t want to. Remember our 5 lanes of traffic. You can get away with it many times, but sooner or later a board will slip out of your hand and land on top of the blade. This will become an experience that you will never forget, or it might become an experience that you will never remember.
Another habit that we must change, is using the tape measure to confirm a dimension on the saw, or to measure the distance from the fence to the blade, while the machine is running. Most of us are too lazy to shut down the machine in order to make these measurements. The results can often be terrifying. The blade can catch your tape measure, and jerk it out of your hand, or it can drag you hand into the blade. I have witnessed both. Neither scenario is pleasant. It also, by the way, ruins the tape measure. This is the big advantage of the newest genre of table saw fences. Once you set them, there is no need to check your fence measurements for every cut. These systems stay pretty well adjusted for a long time, and are more accurate than using a tape measure.
That is unless you have more than one person adjusting the fences. I have had a person adjust one of my saws’ fences, whose tape measure is 1/16 different than mine. So every couple of weeks, I have to reset the fence again. It is still a mystery to me who it can be. This is at the school where I teach. This brings up a good point. Make sure than everyone in your shop is using tapes that measure the same, or everything will approach the fourth dimension. Every semester I have a tape measure contest with all of my students, just to show that all tapes do not necessarily measure the same. Just like all wrist watches do not have the same time. Everyone drops their tape measure once in a while. It usually lands on the hook which bends, giving you a false reading. When you drop your watch, it usually stops or loses time and you buy a new one. When you drop your tape measure, you are going to be just a little bit off.
One thing that I did not think necessary to include, but will now, is the importance of having a first aid kit . It is not required to have one of the commercial kits, but rather a custom one. Make sure that it includes a variety of band aids, and antiseptics. A pair of stout needle nosed tweezers. A variety of sterile gauze pads, a tourniquet, scissors, tape, and anything else that you can think of that will come in handy in case of an emergency. Look upon these items as tools, that are set aside to be used when they are needed. You will not be able to find them when you need them unless you have prepared not just the kit, but a place to keep it. Remember that if any accident happens, you will be in pain, perhaps a great deal of pain, and probably bleeding. You will not be able to hunt these items down, unless you have already prepared a place for them.
Have all of the telephone numbers handy. Dr., Emergency room, etc. You will not have time, nor the inclination to start looking them up when you are in pain, and bleeding. If you dial 911, the paramedics will take you to the nearest emergency room for treatment. This location may or may not have the specialists you require. Refer to previous paragraph, about knowing where to go, on page 2.
When it comes to cutting small pieces, use push sticks or create some kind of fixture that will facilitate the operation. Don’t just start cutting away. You might cut away a valuable part. There are many books written about using fixtures, and creating jigs that help in the cutting process. Study them, use them, invent them, however you do it, try to make it as safe as you can. The trick used in cutting small pieces. Cut longer lengths to width first , then cut to size. Try not to rip very short pieces. Work from longer lengths, then cut to size.
Try to apply what you read selectively. If what you read or see described appears to be a bit dangerous, chances are it is. I honestly don’t understand how some of information gets into print. This will probably be said about my effort here. Never assume that the writer knows what he is writing about. I once met a guy, who is a published writer of wood working subjects. He studies a wood working subject, much like a term paper is researched for a history class. Then based on this “knowledge” writes about it. The fact is, he has never ever, to my knowledge, built or made anything. There is no way that this author, can pass on through his words, what he has not experienced. How to avoid the simple mistakes, in cutting, planning, finishing, etc. Where are the hidden dangers? What happens in cases like this, is the creation of a new conventional wisdom. Once something is published, it becomes gospel. It does not seem to matter whether it is right or wrong. The fact is that people begin to refer to it for help, and then they tell others, who tell others....If it is wrong, the wrong word gets out, and like the ripples on a pond it just keeps growing. While the pond is finite, and the ripples stumble on the shore, the thirst for true knowledge about wood working, keeps growing and growing.... This ever expanding ring of good and bad information becomes the new wisdom. Unfortunately when bad information is utilized, the consequences can be horrific.
If you would like to see the article as it appeared in FineWorking, click on the link below.
Copy Right © Howard Lewin 1998 All Rights Reserved